CLICK HERE FOR FREE BLOGGER TEMPLATES, LINK BUTTONS AND MORE! »

Sunday, June 27, 2010

Daring Bakers - Pavlovas with Chocolate Mascarpone Mousse


The June 2010 Daring Bakers’ challenge was hosted by Dawn of Doable and Delicious. Dawn challenged the Daring Bakers’ to make Chocolate Pavlovas and Chocolate Mascarpone Mousse. The challenge recipe is based on a recipe from the book Chocolate Epiphany by Francois Payard.

June's Daring Bakers was definitely a bit of a challenge for me. The components were not really the difficult part, it was more trying to find the time to complete it that ended up being the challenge. We left on our road trip at the end of May so I read about my challenge from somewhere in Minnesota, we were home for only a few days in the middle of the month, and by the time this posts and you read it I will hopefully be enjoying myself on a warm beach in Hawaii! Needless to say, I am so glad I was able to complete it. There were a few components that I had never made before and it really was a fantastic tasting dessert.

It seems as though the pavlova has many different interpretations. From what I read online, the pavlova was first made in Australia to honor the Russian ballet dancer, Anna Pavlova. It is usually baked like a cake, but it is made with meringue so it ends up crispy on the outside and chewy on the inside. Whipping cream and fruit are then added to the top of the cake to finish it off. However, the recipe that we were given to use seems to be more of a meringue than what the Australians would call a pavlova, but it seems as though they are pretty similar.

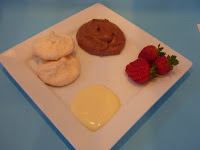
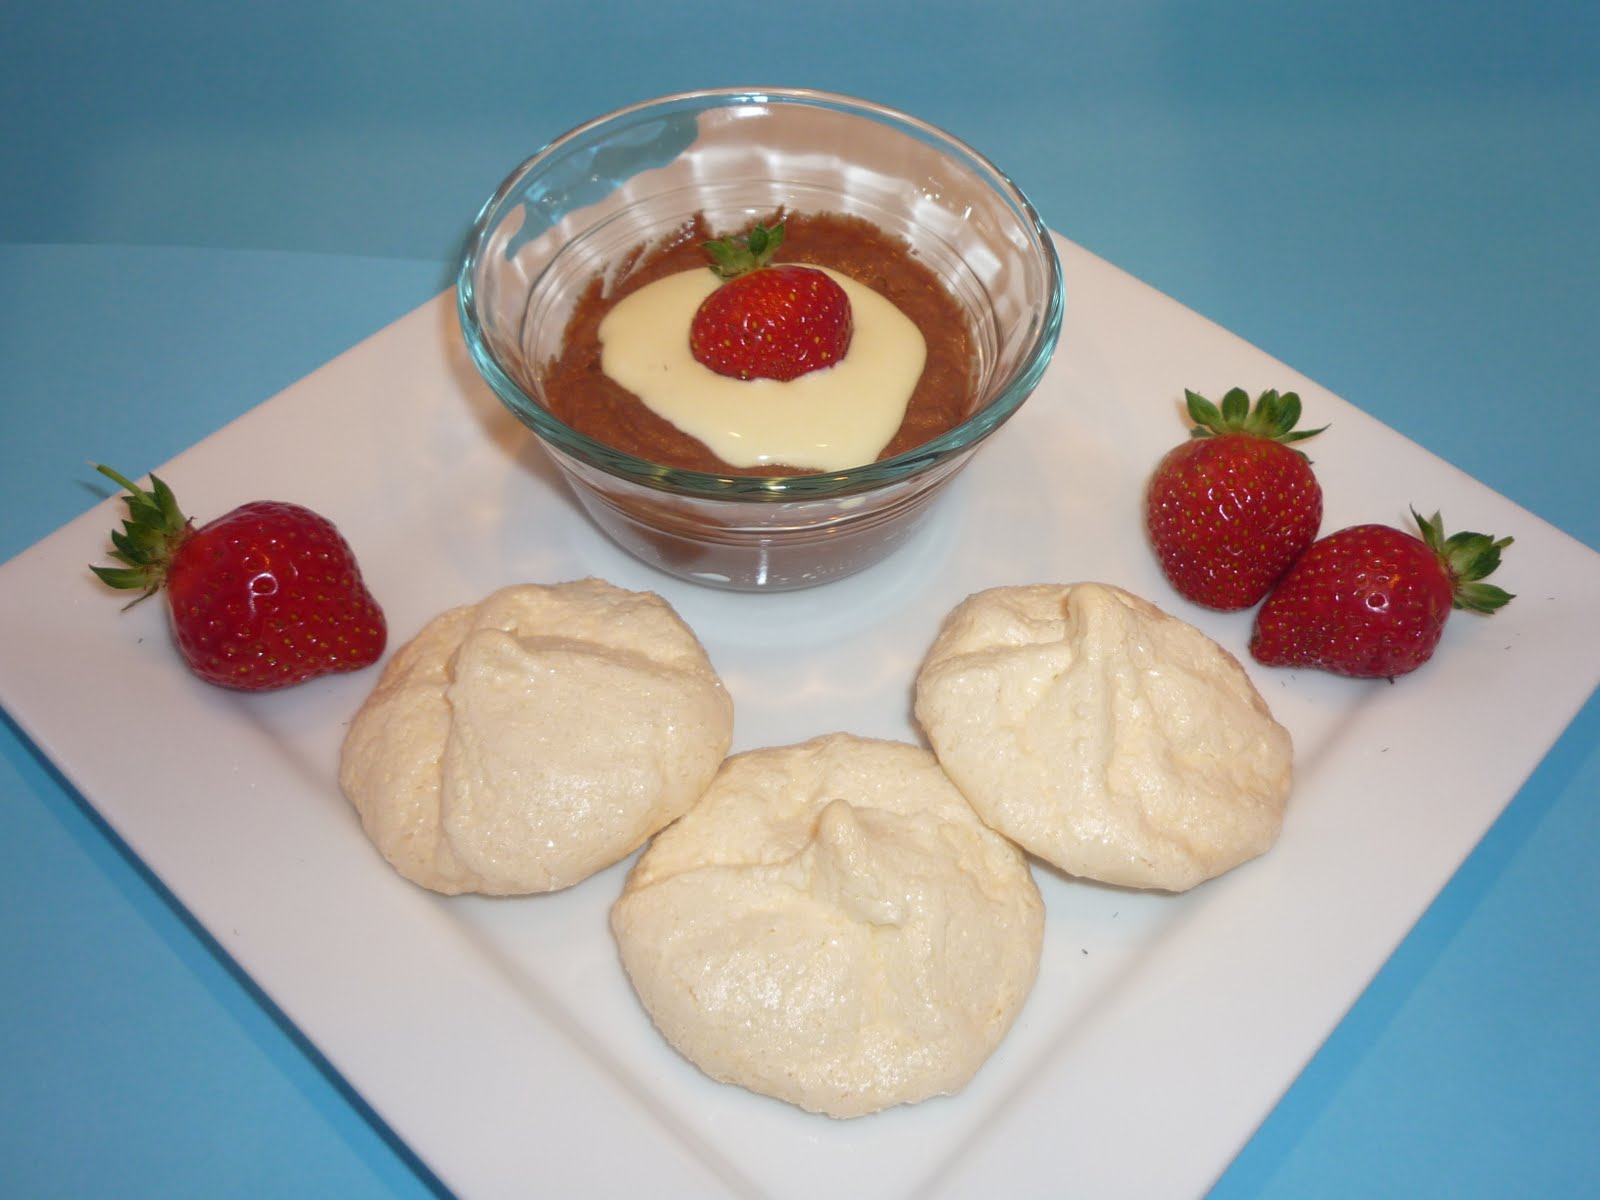
Our challenge was comprised of four parts: the pavlova, the chocolate mascarpone mousse, the mascarpone cream, and the creme anglaise. I began by making the creme anglaise. It reminded me a bit of the creme we had made for the pastries in our croquembouche so I used a few of the tips that I learned from that experience. Everything went well during this process.


I then made the pavlovas. This was my first attempt at making meringue. I have never even made a lemon meringue pie, although it is on my top 100 list, so it was definitely a new experience for me. I wanted to make the pavlovas small because it sounded like they were really rich, and since it was just my husband and me eating them I didn't want to have to polish off a whole pavlova in one sitting. These also turned out well. I did a few different versions, some bigger than others and with varied designs.

 
The chocolate mascarpone mousse was next. Another first for me! This did give me a bit of a problem but I was able to work it out. Right after adding the chocolate to the cream it seemed as though the fat separated from the rest of the mixture and I had a chocolate glom sitting in a pool of liquid. I was able to fold in the mascarpone cream and it brought it together, although it was still a bit grainy. But the flavor! Oh my goodness! I loved how you could taste the citrus flavor (orange and lemon) in the mousse, and it seemed even more pronounced after sitting in the fridge for a few days.


I had fun playing around with different ways to plate it. Also, I used both strawberry and mango to garnish my pavlovas. Both were equally yummy!


For the recipes and more versions of the pavlova, email me. Enjoy!

Wednesday, June 23, 2010

Cross Rib Roast with Herb Rub


Do you know how hard it is to get an appetizing picture of a main dish? I know my family is not too keen on sitting around waiting for me to get a great shot for my blog while their dinner is rapidly cooling on the counter. Hence, for most of my main dish photos you will see a photo of the item on the plate it is being served on, as a part of the entire dinner, or possibly separated just before it goes in the freezer. And that being said, it may not look like a photo for a food magazine, but last I checked I wasn't working for one of those anyway.

This recipe really was a scrumptious way to prepare a fairly low budget cut of meat. For a long time I wasn't sure the best way to prepare a cross-rib roast, and we aren't big roast eaters, so it had been sitting in my freezer for many months until I finally broke down and searched and found this recipe. Delicious! Enjoy!

Cross Rib Roast with Herb Rub
Source: Food.com

2 pounds cross-rib roast
2 tablespoons balsamic vinegar
2 tablespoons minced garlic
2 teaspoons dried thyme
1 teaspoon dried rosemary
1 tablespoon salt
1 teaspoon pepper
1 tablespoon olive oil

Preheat oven to 450 degrees. Brush roast with balsamic vinegar. Make a paste with the remaining ingredients and apply to meat. 

Roast meat at 450 degrees for 15 minutes. Reduce heat to 350 degrees and cook for 40 to 60 minutes, or until internal temperature reaches 125 degrees. 

Remove from oven; cover loosely with foil and let stand 15 to 25 minutes.

Saturday, June 19, 2010

Caramel-Hazelnut Mini Tartlets


The second I saw this recipe I knew it was destined to be in my kitchen. The thought of a shortbread type dough, caramel, hazelnuts, and chocolate was a combination I knew would be pointless to resist. It was a few months though before I found the time or opportunity to actually bake them, but it was definitely worth the wait! 


Although the original recipe said to blend the dough in a food processor, I ended up using a pastry blender, similar to making a pie crust, since my food processor is teeny tiny and I can't stand using it. I also found that it was easier to divide the dough evenly if I slightly rolled a ball and put it in each muffin tin, then went back and with a floured tart shaper, smooshed the dough into the tart shape.


Doesn't that caramel look amazing? I love the way brown sugar and butter look together when they are beginning to melt and combine. Kind of goofy, I know, but oh well.


It was an interesting process trying to husk the hazelnuts. I read online that if you bake them at 350 degrees for about 5-10 minutes and then dump them in a cloth towel and vigorously rub them together the husks will just fall off. Well, that wasn't exactly my experience. I did get a good arm workout though! As you can see, some of the husks came off but eventually I just gave up and chopped them into pieces anyway. It is a bit messy when you spoon the caramel into the tarts. It is easier if they are sitting on a wire rack and then you can wipe off any runoff before you put them on a pan to put them in the fridge.


It sure doesn't look like there are many of them when there are about 30 on a serving platter, but be ready for them to be gobbled up quickly. Enjoy!

Caramel-Hazelnut Mini Tartlets
Source: Epicurious

Crusts:
1 1/2 cups all purpose flour
2 tablespoons sugar
1/4 teaspoon salt
1/2 cup unsalted butter, chilled, cut into 1/2-inch cubes
5 tablespoons chilled whipping cream
1 teaspoon vanilla extract
---
1 cup hazelnuts, husked and toasted

Butter 30 metal or silicone mini muffin cups. Blend flour, sugar, and salt. Add butter and blend until mixture resembles course crumbs. In a small bowl or cup, stir together 5 tablespoons whipping cream and vanilla; add to dough mixture until it begins to clump together. (Add more cream by teaspoonfuls if dough is dry).

Divide dough evenly between the 30 muffin cups. Press 2 teaspoonfuls of dough evenly onto bottom and up sides of each prepared mini muffin cup or press with a floured tart shaper. Pierce tartlet crusts with a fork. Freeze for 30 minutes (or cover and refrigerate for up to one day ahead).

Preheat over to 350 degrees. Bake frozen crusts until golden and baked through, about 25 minutes. Transfer to rack and cool crusts in muffin cups 10 minutes. Carefully loosen from muffin cups, transfer to wire rack and cool completely. Place 2 to 3 hazelnuts in each crust.

Caramel Filling:
1 1/3 cups golden brown sugar, packed
7 tablespoons unsalted butter
6 tablespoons light corn syrup
2 tablespoons water
1/2 teaspoon salt
6 tablespoons whipping cream
---
3 ounces bittersweet or semisweet chocolate, chopped

Combine brown sugar, butter, corn syrup, 2 tablespoons water, and salt in heavy medium saucepan. Stir over medium heat until sugar dissolves. Bring mixture to boil; boil about 2 minutes without stirring (mixture will bubble up and thicken slightly). Remove pan from heat. Add cream (mixture will bubble vigorously); stir until smooth.

Pour caramel into 2-cup measuring cup; cool 10 minutes. Spoon caramel over hazelnuts in crusts, filling crusts almost to top. Refrigerate until caramel begins to firm up slightly, about an hour.

Melt chocolate in double boiler or microwave. Drizzle melted chocolate over top of tartlets. Chill until chocolate is set, about 30 minutes.

**Mini tartlets can be made 1 day ahead. Keep refrigerated. Let tartlets stand at room temperature 1 hour before serving.**

Wednesday, June 16, 2010

Clifford Sized Cookie


The title of this post, as well as the frosting on the cookie, require a little explanation. A few weeks ago, our theme for preschool was cookies. One of the books we chose to read was called Cookie Crazy, and it was about Clifford visiting the local fair and giving in to the temptation presented in the form of a giant cookie. I don't think the life lesson they were trying to teach was about giving in to temptation, but after reading about giant cookies it's only appropriate that we would bake a giant cookie.

The frosting is in honor of our song for that week of preschool. You know the one . . .  sung by the great vocalist, Cookie Monster . . .
C is for cookies, that's good enough for me,
Oh, cookies, cookies, cookies start with C.  

And we could go on with the words but since you already have it stuck in your head like I do, I'll just let you finish it out. Oh, and if you were like me and you had never heard this song before because you didn't really watch Ses.ame Street as a kid, then you can g.oogle the title and actually see Cookie Monster performing it on youtube. 

**On a side note, I'm not sure if you need a baking stone for this or not. It might work with a pizza pan, but I've never tried it because I have a baking stone.**

Colossal Candy Cookie
Makes about 10 servings

1 cup candy-coated chocolate pieces
1 1/2 cups all-purpose flour
1/2 teaspoon baking soda
1/4 teaspoon salt
1/2 cup butter or margarine, softened
1/3 cup sugar
1/3 cup packed brown sugar
1 egg
1 teaspoon vanilla

Preheat oven to 350 degrees. Reserve 1/3 cup candies for decorating; coarsely chop remaining candies. Set aside.

In a bowl, combine the flour, baking soda and salt; mix well. In a mixing bowl, beat butter and sugars until creamy. Add egg and vanilla; beat well. Add flour mixture; mix well. Stir in chopped candies. 

Place dough in center of pan. Using a lightly floured rolling pin (or your hand) spread the dough to an inch or two from edge of pan. Decorate with reserved candies.

Bake for 16-18 minutes or until light golden brown. Cool completely. Carefully loosen cookie from pan. Cut to serve.

Saturday, June 12, 2010

Orange Berry Muffins


I don't have much to say about this one. There can't have been many people who haven't had a blueberry muffin at some point in their life. Since I like trying out different blueberry muffin recipes, I figured I'd try this orange blueberry muffin. It was yummy, as are most blueberry muffins! Enjoy!

Orange Berry Muffins
Source: Brown Eyed Baker

grated zest and juice of 1 orange
about 3/4 cup buttermilk
2 large eggs
3 tablespoons honey
1/2 cup unsalted butter, melted and cooled
1/3 cup sugar
2 cups all-purpose flour
2 1/2 teaspoons baking powder
1/4 teaspoon baking soda
1/4 teaspoon salt
1 cup blueberries - fresh (preferably) or frozen (not thawed)
---
decorating sugar for topping (optional)

Preheat oven to 400 degrees. Prepare your muffin pan by spraying or lining with paper liners.

Pour the orange juice into a large glass measuring cup and then pour in enough buttermilk to make 1 cup. Whisk in the eggs, honey, and melted butter.

In a large bowl, rub the sugar and orange zest together with your fingertips until the sugar is moist and the fragrance of orange strong. Whisk in the flour, baking powder, baking soda, and salt. Pour the liquid ingredients over the dry and gently, but quickly, stir to blend. Stir in the blueberries. Divide the batter evenly among the muffin cups.

Bake for 22 to 25 minutes. If you want the tops of the muffins decorated with sugar, sprinkle on the sugar after the muffins have been baking for 10 minutes. When fully baked, the tops of the muffins will be golden and springy to the touch and a thin knife inserted into the center of the muffin will come out clean. Transfer the pan to a wire rack and cool for 5 minutes. Remove muffins from pan.

Wednesday, June 9, 2010

Starfish Cookies


Don't you just love starfish? Well, maybe not the real thing so much, but these sugar cookies sure are cute! We wrapped these up and gave them to our MOPPETS workers as thank you's. Included was the following story.

The Starfish Story
Original Story by Loren Eiseley 

One day a man was walking along the beach when he noticed 
a boy picking something up and gently throwing it into the ocean.
Approaching the boy, he asked, "What are you doing?"
The youth replied, "Throwing starfish back in the ocean. The surf 
is up and the tide is going out. If I don't throw them back, they'll die."
"Son," the man said, "don't you realize there are miles and miles of beach 
and hundreds of starfish? You can't make a difference." 
After listening politely, the boy bent down, picked up another starfish, 
and threw it back into the surf. Then, smiling at the man, he said . . .
"I made a difference for that one."


You can find the cookie recipe here. Enjoy!

Saturday, June 5, 2010

Chicken Enchiladas


If you ever have a baby, a family illness, or some other need for a meal to be delivered to you this is most likely what I will holding while standing on your doorstep. These chicken enchiladas are mild tasting, delicious, very filling, and they freeze great. Enjoy!

Chicken Enchiladas
Makes about 8-10 enchiladas (depending on how full you fill them)

10 ounces cooked chicken (can do fresh or canned)
1 can cream of chicken soup
1 can diced green chiles
1 can green chile enchilada sauce
1 container sour cream
8-10 medium tortillas 
cheddar or jack cheese, shredded (enough for sprinkling over the top)

Preheat oven to 350 degrees. 

Mix chicken, cream of chicken soup, green chiles, and about half of the can of enchilada sauce in a bowl until combined. Pour about a 1/4 of the remaining enchilada sauce in the bottom of a 9x13 pan. 

Spread a spoonful of sour cream over tortilla. Place small amount of chicken mixture on one end of tortilla. Roll it up and place it seam side down in pan. (I usually do this a an assembly line with all 8-10 tortillas laid out on the counter so that I can evenly distribute the chicken mixture.)

When all enchiladas are in the pan, pour the rest of enchilada sauce over the top and sprinkle generously with shredded cheese. Bake for about 20-30 minutes. 

If planning to freeze, cool completely, then wrap 2 at a time in aluminum foil.

Tuesday, June 1, 2010

Rainbow Cake (Six Layer Version)


I had these grandious plans to make a six layer coconut cake from the Peninsula G.rill, but that plan fizzled quickly when I got back home from running my half marathon and realized I was too tired and my cupboards were to bare to have even a semblance of what was needed for this monster cake. Another recipe for another time, I guess. I then thought I'd make a coconut layer cake that wasn't quite such a monster but decided that I really needed to go with something that I knew and was familiar with. Hence, the six layer rainbow cake that you see pictured above. This was my first time actually making it as a true six layer cake. My other versions involved a single layer and cupcakes so this was a deviation from the past, and even though I knew I had made something somewhat similar before, the ladies to whom I fed it to had not seen it before.


I followed the recipe exactly. It was helpful to have the wax paper under the layers of finished cake until I was finished icing. If not, can you imagine how messy that glass cake stand would have been? That's the first time I've actually used that method to frost a cake so it was fun to try a new technique.

Whipping up the buttercream frosting was an interesting experience. I thought for sure that I had whipped it too much and it had curdled, but lo and behold I waited just a few more minutes until the sound of the mixer changed and when I looked it was absolutely perfect. Not the smoothest buttercream you've ever seen but it was definitely tasty! Enjoy!


Rainbow Cake
Source: Whisk Kid

Cake:
3 cups cake flour
4 teaspoons baking powder
1/2 teaspoon salt
2-1/3 cup sugar
1 cup unsalted butter, room temperature
5 egg whites, room temperature
2 teaspoons vanilla
1-1/2 cups milk, warmed about 30 seconds in microwave to bring to room temperature
food coloring (gels work the best)

Preheat oven to 350 degrees. Oil and line three 9" cake pans or however many you have. (I just reused the three I had.)

Sift together the flour, baking powder, and salt. Set aside.

Cream the sugar and butter. Add the egg whites one at a time; add the vanilla and mix until fully incorporated. Then, alternating between wet and dry, add the milk and flour mixture in two parts.

Divide the batter between 6 bowls. (Easiest way is to do it by weight.) Stir in a fair amount of the appropriate food color to each bowl. Pour into pans and smooth out so batter is even. Bake for about 15 minutes each.

Remove from oven; let rest in pan on cooling rack for 10 minutes. Then flip, cover, and put them in the fridge to cool quickly.

Lemon Swiss Meringue Buttercream
To fill and crumb coat
9 egg whites
1-3/4 cup sugar
2 cups unsalted butter, room temperature
2 teaspoons lemon extract

To frost:
5 egg whites
1 cup sugar
1 cup butter, cubed, room temperature
1 teaspoon lemon extract

Cook the egg whites and sugar in a small saucepan over medium heat, whisking constantly, until the sugar is completely dissolved. Pour into another bowl and whip on high speed until room temperature (about 10 minutes). Then, on a medium-low speed, add the butter one cube at a time, waiting until each piece is incorporated before adding the next. After all the butter has been added, turn the mixer back up to high speed and whip until it has come together (about 5 minutes). Add the extract, beat briefly. (If the buttercream seems soupy after all the butter has been added, refrigerate for 5 to 7 minutes and continue whipping until it becomes fluffy and workable.)

Assembling:
Start with whichever end of the rainbow you would like to. Lay first layer down on plate. (I divided my frosting for filling and crumb coating into six bowls because I wanted to make sure I had enough.) Cover with layer of frosting, top with next cake layer, repeat for all layers. You may want to chill the cake at this point so the frosting is more workable. Cover the top and sides of the cake with frosting.