CLICK HERE FOR FREE BLOGGER TEMPLATES, LINK BUTTONS AND MORE! »

Saturday, June 30, 2012

Strawberry Checkerboard Cake


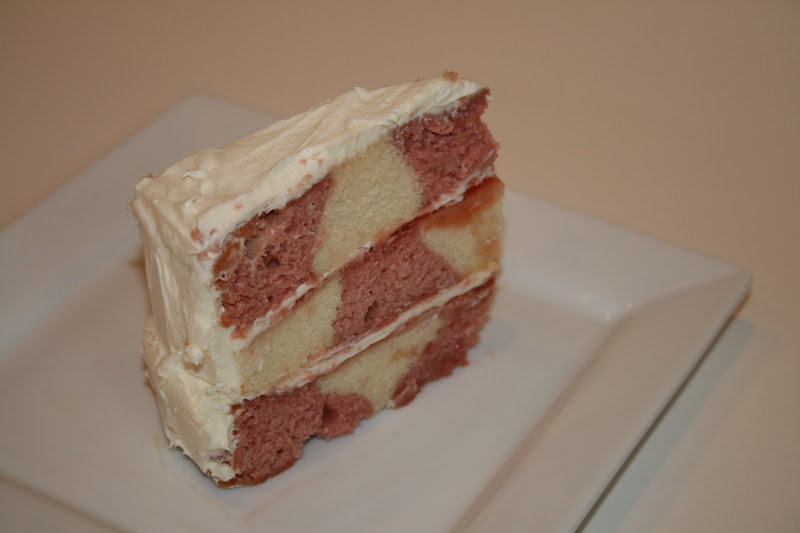
I had another opportunity to try out a new recipe and serve it to unsuspecting people! Another baby shower, yes we've had a lot of babies born to our staff this year, and this time it was for a girl. The mom-to-be requested either a chocolate or strawberry cake. I really wanted to do something fun so I decided to make a checkerboard cake again. The only problem was that I knew the raspberry checkerboard turned out really well but I wasn't sure if changing up the fruit would make a difference in the cake. I remember researching checkerboard cakes before and there being mixed reviews about moist versus dry and everything in between. I was a bit nervous to monkey around with the ingredients but I decided to give it a go.

I followed the raspberry checkerboard recipe, just switching out strawberries for raspberries. The cake came together similarly, although the white cake spread a bit more than the strawberry so my checkerboard didn't turn out exactly like a checkerboard this time.


Personally I didn't like this strawberry cake as much as the raspberry cake. Everyone at the shower raved about it, but remember, they were unsuspecting having never had the raspberry version before. Both my husband and I who have had both like the raspberry better. There just seemed to be a bit more of a distinct flavor between the two with the raspberry checkerboard. Still, this one was pretty good too. Enjoy!


Strawberry Checkerboard Cake with White Chocolate Frosting

Cake:24 ounces frozen strawberries
1 cup strawberry syrup, such as Torani
4 cups cake flour
3 teaspoons baking powder
1 teaspoon salt
1 cup unsalted butter, at room temperature
2 cups sugar
4 eggs
1 tablespoon pure vanilla extract
1 cup whole milk

Frosting:
1/2 cup seedless strawberry jam
1 cup unsalted butter, at room temperature
2 - 8 ounce packages cream cheese, at room temperature
1/2 teaspoon almond extract
12 ounces white chocolate, melted and cooled to room temperature
1 cup powdered sugar
a few fresh strawberries for garnish

Tips: Spread the jam between layers very lightly to preserve the checkerboard effect.

Preheat oven to 325 F.

Lightly coat the cake pans with cooking spray and dust with flour. Set aside. In a medium saucepan over moderate heat, combine frozen strawberries and strawberry syrup. Bring to a simmer, reduce heat to low and continue cooking until liquid reduces by two-thirds.

Remove from heat and strain, pressing on the strawberries to release all the juices. There should be approximately 1 cup. Dispose of the strawberry pulp or reserve for another use. Add the food coloring, if using.

If there is more than 1 cup of juice, put in a small saucepan over medium heat and reduce to 1 cup; cool to room temperature. If there is less than 1 cup, add enough water to equal 1 cup.

In a medium bowl, sift together cake flour, baking powder and salt; set aside.

In the bowl of a stand mixer fitted with the paddle attachment, cream the butter and sugar until light and fluffy. Add the eggs one at a time, beating well after each addition. Beat in the vanilla extract.

Divide the batter in half. To one half of the batter, beat in the 2 cups of the flour mixture alternately with the milk to the batter, beating after each addition until smooth. To the remaining batter, beat in the remaining flour mixture alternately with the strawberry syrup to the batter until smooth.

Place checkerboard divider into one prepared pan. Then spoon in the two batters (red and plain) as described in "How to use your Checkerboard Cake Set."

Place all 3 pans in oven at same time. Rotate pans halfway through baking. Bake approximately 20 to 25 minutes, or until a toothpick inserted in the center comes out clean. Let the cakes rest in the pans, set on a rack, for 10 minutes. Place a cooling rack on top of each cake, invert the cake and remove the pan. Cool completely.

Using no more than 1/4 cup of jam, frost a very thin layer on top of one of the white cakes and on the strawberry cake.

In the bowl of a stand mixer fitted with the paddle attachment, cream the butter and cream cheese on high speed until light and fluffy, approximately 5 minutes. Beat in the almond extract. Reduce the speed to low and carefully drizzle the chocolate into the cream cheese. Increase the speed to high and beat until light and fluffy, about 2 minutes. Add powdered sugar and beat until well incorporated.

Spread a thin layer of frosting on the jam-covered white cake. Place the strawberry cake on top of this cake and spread a thin layer of frosting on top. Place the last white cake on top. Frost the sides and top of the checkerboard cake. Refrigerate until ready to serve.

Tuesday, June 26, 2012

Cheesy Veggie Chowder


Another soup recipe that is a keeper at this house! Creamy, filling, and delicious! If you chop the veggies ahead of time this soup can come together pretty quickly. We added our broccoli and didn't cook it at the end for long enough so the broccoli was a bit al dente. I will probably cook it a bit longer this next time. Enjoy!

Cheesy Veggie Chowder Source: Lulu the Baker

2 tablespoons butter
1/2 cup onion, finely chopped
1 cup carrot, finely chopped
1 stalk celery, finely chopped
1 tablespoon minced garlic
4 cups chicken broth
2 large baking potatoes, peeled and chopped
1 tablespoon flour
1/2 cup water
2/3 cup milk
2 cups broccoli, chopped
2 heaping cups shredded cheddar cheese

Melt the butter in a large soup pot. Add onions, carrots, and celery; saute over medium heat until tender (about 10 minutes).

Add garlic and cook 1 or 2 additional minutes.

Add chicken broth and potatoes, bring to a boil, and cook until potatoes are tender (about 15 minutes).

Mix flour with water, add, and simmer until soup is slightly thickened.

Add milk and broccoli and cook until broccoli is just tender and soup is heated through.

Stir in cheese, allow to melt. Serve.

Makes 6 servings

Friday, June 22, 2012

Spaghetti Bread


One of my friends posted this on pinterest as one of her first recipe links. I was curious so I looked it over and repinned it hoping to get the chance to try it relatively soon. A few months later that chance came along.

I already had a few loaves of Rhodes bread frozen and waiting to be used. I can't remember what I used them for previously because I don't often use frozen bread, so I thought this would be a good opportunity to try it out.

I thawed the bread, rolled it out and tried to stretch it as far as I could. I think I've already mentioned that I can't stand rolling to a certain size or shape and it definitely get to the desired size and shape with that first roll out. The comments on the recipe said to wait about 15 minutes, and I decided to take their advice. My second roll out got my shape a bit bigger but not exactly a rectangle. Oh well, close enough.


I filled it with the spaghetti and sauce, put a few pepperoni's on top, and scattered the cheese thoroughly. I ate a few pieces of cheese for good measure, since there were a few left over and all.


The braiding commenced. It wasn't as beautiful as other braids I've done, but it was passable so that we could get it into the oven for dinner. A sprinkle of Parmesan, garlic salt, and parsley and in it went.


Freshly baked and out of the oven. It held together really well, sliced easily, and was a hit with the family. Enjoy!


Spaghetti Bread
Source: Rhodes Bread

1 loaf Rhodes Bread Dough, thawed to room temperature (or your own bread dough)
6 ounces spaghetti noodles, cooked
1 cup thick spaghetti sauce
1/2 pound ground beef or Italian sausage
8 ounces mozzarella cheese, cut into 1/2 –inch cubes
1 egg white
Parmesan cheese
parsley flakes

Spray counter lightly with non-stick cooking spray (or use parchment paper). Roll loaf into a 12x16-inch rectangle. Cover with plastic wrap and let rest for 10-15 minutes.

Cook spaghetti noodles according to package instructions; drain. Cook ground beef or Italian sausage, drain if necessary. Stir together spaghetti noodles, spaghetti sauce, and meat; cool slightly.

Remove wrap from dough. Place spaghetti mixture lengthwise in a 4-inch strip down the center of dough. Top with cheese cubes.

Make cuts 1 ½-inches apart on long sides of dough to within ½-inch of filling.

Begin braid by folding top and bottom strips toward filling. Then braid strips left over right, right over left. Finish by pulling last strip over and tucking under braid.

Lift braid with both hands and place on large sprayed baking sheet. (or transfer parchment paper to baking sheet). Brush with egg white and sprinkle with Parmesan cheese and parsley. Optional: sprinkle with garlic powder.

Bake at 350 for 30-35 minutes or until golden brown. Cool slightly and slice to serve.

Makes about 8 servings

Saturday, June 16, 2012

Chocolate Covered Strawberries


For years I've had a recipe card in my collection that shows how to make cute chocolate covered strawberries that look like tuxedos. I've always wanted to make them but have never found the time or the desire to actually follow through on it. This time wasn't any different as you can see. I made these for a baby shower so I didn't think tuxedos were quite in line with the theme of the party.

The process really wasn't terribly difficult. I wanted to try to temper the chocolate because I thought they would look more polished if they were shiny. I have a difficult time tempering chocolate, so I did my best. You can't imagine how hard it is to get chocolate to a certain degree without it going past that. Near impossible, I say.

Once the chocolate was tempered and cooled a bit I got down to business. For most of the strawberries I ended up spearing them with a toothpick through the top so I could dip them down into the chocolate without ripping off the greens. It also gave something for them to lean against so that they didn't roll around while drying.


Eventually I ran out of toothpicks and ended up holding the larger berries by the greens in order to dip them in. It worked just about as well as the toothpicks so if you don't have any on hand you don't have to stress out about it.

The chocolate hardened pretty well just sitting on the pan at room temperature but I wanted to make sure that they stayed as fresh as possible for the baby shower the next afternoon. I researched the best way to store chocolate covered strawberries overnight and found out that if you put them in individual baking papers (like cupcake liners), put a sealed lid on it and stick them in the fridge they have the best chance. There is a bit of sweating that can happen from the chocolate taking on the water in the strawberries, so I was surprised when I took them out of the fridge the next morning and they looked absolutely perfect!

I placed them in the fridge at work and grabbed them back out that afternoon. Unfortunately that fridge had a different temperature setting, almost like a freezer, and the berries did a lot of sweating while sitting in there. They still tasted good but they had little beads of water on the chocolate and the chocolate was a bit wet where it was sitting in the paper liners. Oh well, all the guests enjoyed them and that is really what matters. Enjoy!

Tuesday, June 12, 2012

Homemade Pizza


Sometimes it is easier to just pick up a pizza or grab one out of the freezer instead of making it from scratch. And sometimes you decide that making it from scratch sounds like more fun so you tackle the challenge. I decided to tackle this one on the same day that I made four loaves of Challah bread. Yes, we had a lot of yeast dough rising to be sure!

It really wasn't that difficult to make. Mix it all up, let it sit for a few hours, knead it, roll it out, and layer it with sauce, cheese and toppings. Pretty straight forward as far as pizza is concerned. We made a pepperoni and black olive that we figured would be tame enough for our little guy to eat. It was, and he actually ate it even though it didn't come from a store or restaurant. I swear, sometimes the boy just decides to be difficult because something that is homemade is not exactly like the store bought variety.

The other pizza has ham, pepperoni, squash, and black olives on it. We usually also add mushrooms but we forgot to get them this time. I think that was just fine though because this pizza was heavy enough as it was.

I thought the crust flavor was okay. I think I'd like to try the dough from the stromboli that I make as a pizza crust next time. There was just something about it that didn't quite work for me. Maybe it was the sauce, who knows. It was something though.


Pizza Dough
Source: Lauren's Latest

1 cup warm water
2 1/4 teaspoons active dry yeast
1 tablespoon honey (or sugar)
2 teaspoons salt
2 tablespoons olive or canola oil
3 cups bread flour (give or take 1/2 cup…depending on the heat and humidity)

In a large mixing bowl, preferably that of a stand mixer, stir yeast and honey into warm water. Sit for 5-10 minutes or until bubbles form and mixture starts to foam. Pour in salt, oil and half the flour; mix.

Once that flour is incorporated, start adding flour in bit by bit until you get the pizza dough to the consistency you want: slightly tacky, but when you touch it it doesn’t stick to your hands.

Once you reach this stage, turn the mixer on high and knead for 6 minutes. The dough should be smooth and easy to work with and the bowl should be clean.

Lightly grease the bowl and the dough so it doesn’t dry out, cover with plastic wrap and let it rise 1-2 hours.

Punch dough down, and roll out to about 12 inches. Top with sauce, cheese, and your favorite toppings.

Bake at 450-500 degrees F for about 10-15 minutes.

Makes 2 - 12 inch pizzas

Friday, June 8, 2012

Cookie Jar Teacher Appreciation


As a teacher you would think that I would remember things like teacher appreciation week and the end of the school year teacher gift. Yep, you would think that. This year, my son's first year of school, I seemed to have forgotten these things. I know it's only preschool, but still.

When I got home from teaching my own class on the eve of my son's last day of school my husband mentioned that our son would like to give his teachers a gift on the last day of school. Quick, run to the computer and look for cute ideas that would be easy to throw together. Type in "teacher appreciation" to pinterest and score!

I found quite a few, but the cookie jar filled with cookies and a homemade card was at the top of my list. I knew that I could quickly bake some awesome cookies, so we ran to the store to get the cookie jars. My son's first suggestion upon asking what he wanted to give his teacher's was "hot wheels" so my husband thought it would be fitting to pick up a hot wheel for each teacher as well, hence the car you see in the photo. A cute gift that was pretty quick and easy to make. Enjoy!

If you want the cookie recipe, click here.

Monday, June 4, 2012

Maple Hazelnut Oatmeal


Don't you love throwing ingredients into a crockpot when you go to bed and then waking up in the morning to breakfast already being made. It's almost like magic or something! The downfall is that you have to pull out the ingredients and get them thrown into the crockpot at the end of a long day. The plus, waking up the next morning to a prepared meal. You'll have to weigh those pros and cons for yourself.

This is the second overnight steel cut oatmeal recipe that we have tried and we prefer it over the other. This had a nice oatmeal taste with the cinnamon and maple flavors, and it had a good texture with the soft oats and crunchy hazelnuts. Enjoy!


Maple-Hazelnut Oatmeal

Source: Brown Eyed Baker

1 1/2 cups milk
1 1/2 cups water
2 Gala apples, peeled, cored, and cut into 1/2-inch cubes (~3 cups)
1 cup uncooked steel-cut oats
2 tablespoons brown sugar
1 1/2 tablespoon butter, softened
1/4 teaspoon cinnamon
1/4 teaspoon salt
cooking spray
1/4 cup maple syrup
2 tablespoon chopped hazelnuts, toasted

Bring milk and water to a boil in a saucepan over medium-high heat, stirring frequently.

Place hot milk mixture, apple, and next 5 ingredients in a slow cooker coated with cooking spray, stir well. Cover and cook on LOW 7 hours or until oats are tender.

Ladle oatmeal into individual bowls; top with maple syrup and hazelnuts.

Makes 4 servings