CLICK HERE FOR FREE BLOGGER TEMPLATES, LINK BUTTONS AND MORE! »

Tuesday, July 27, 2010

Daring Bakers - Swiss Swirl Ice Cream Cake


The July 2010 Daring Bakers’ challenge was hosted by Sunita of Sunita’s world – life and food. Sunita challenged everyone to make an ice-cream filled Swiss roll that’s then used to make a bombe with hot fudge. Her recipe is based on an ice cream cake recipe from Taste of Home.


Isn't this cake the bomb? I mean, literally it is a bombe, and who can't fall in love with a cake that looks this delectable! Out of all of my Daring Baker's challenges this one probably took me the longest, but I think it just may have been the most fulfilling challenge I have completed as of yet. I absolutely adore ice cream, especially homemade, and if you pair that with cake and hot fudge then I'm over the moon.

I started by going to the library and checking out The Perfect Scoop by David Lebovitz. I was amazed at all the different flavors. Avocado, black pepper, basil . . . wow! But I have to say that as amazing as those flavors sounded I am usually drawn to something right away and no matter how hard I look I just keep coming back to that recipe or item. For me it was the toasted almond and cherry ice cream. I loved the look (as I've mentioned before I'm very visual) and the flavors and textures sounded fantastic. I knew that chocolate would be great paired with that so I knew I was going to make the swiss roll a chocolate flavor as well as the hot fudge for the center of the bombe. I kept wavering a bit on the second flavor of ice cream because I wanted to try something new but I also wanted a flavor to compliment the toasted almond and cherry. In the end I went with a chocolate with mini chocolate chips mixed in.

I first made the chocolate ice cream. It was a great experience and very easy since I had just made vanilla about a week ago. The process was pretty much the same. I chose to make a custard style because I wanted the ice cream to set well and for it to be rich and creamy like ice cream as opposed to ice milk. Once the ice cream was finished churning I mixed in the mini chips and stuck it in the freezer for the few days until I could assemble the whole cake. (See below for recipe) 


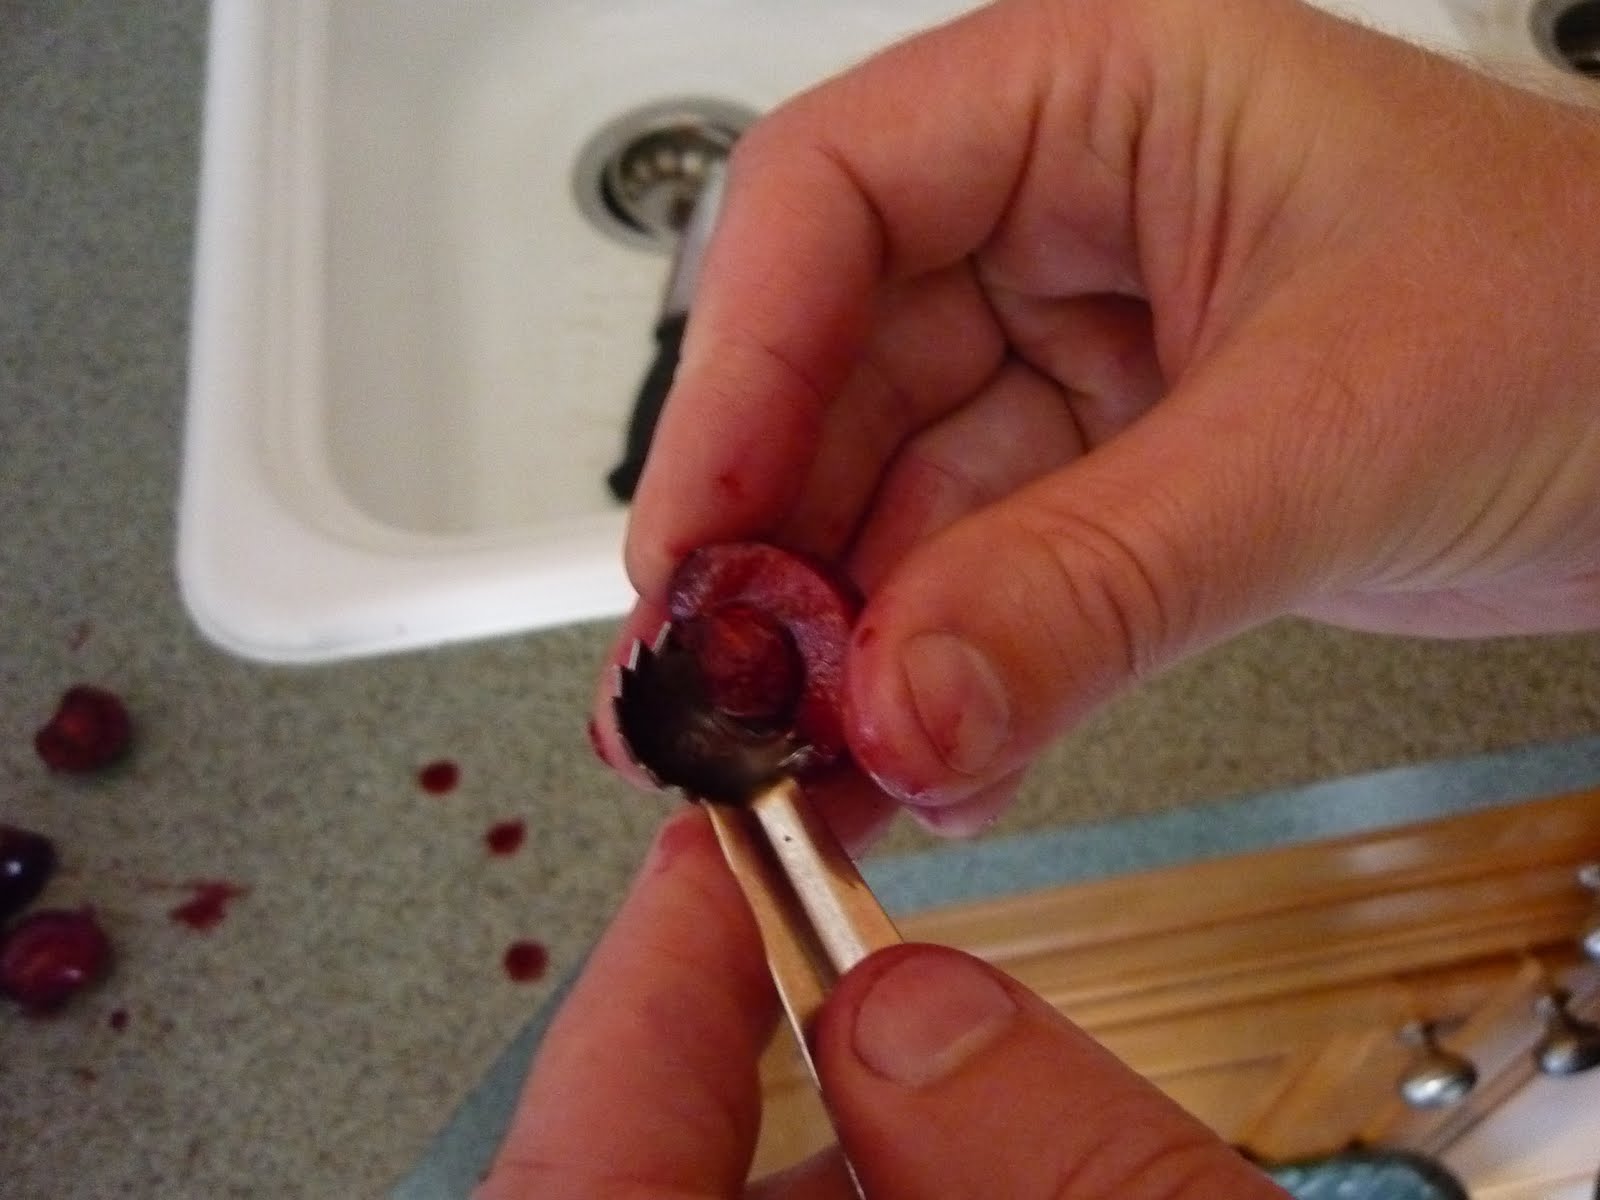
Next up was the toasted almond and cherry ice cream. Fresh cherries from the local farmer's market . . yum! Pitting them was an interesting process and a new one for me. After the cherries were candied and the almonds were toasted and chopped, it was time to make the ice cream. This recipe was also a custard style ice cream that required you to steep the almonds in the cream for about an hour. After they were finished steeping you were told to squeeze out the almonds to get all the cream and then discard the almonds. Who in the world is just going to discard over a cup of finely chopped almonds that have been steeped in a sweet, cream? Not me! Those babies went into a ziploc bag and into the fridge where they are waiting to become a crust to a pie or something equally delicious. I probably could have sat there with a spoon and just eaten bite after bite of these almonds. (See below for recipe) 


Never having made a swiss roll cake before I have to admit I was a teeny bit nervous. Especially with how many people were mentioning that their cakes cracked and fell apart. I really didn't want make more than one so I was hoping I'd get it right the first time. Thank goodness it went off pretty much without a hitch. I ended up using pillowcases to wrap the cakes in because I didn't have thin enough dishtowels. That, and you need about six hands: Two to roll the cake, one to hold down the pillowcase while the other is using a spatula to make sure the cake doesn't stick to the pillowcase, and two for taking a picture of it! (Click here for recipe)


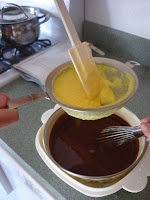
The fudge sauce went together quickly. I don't know if mine thickened up quite as much as it was supposed to but it was thick enough once it sat in the freezer overnight. (Click here for recipe)


Although the process to assemble was quite lengthy if you waited for each layer to freeze it wasn't terribly difficult. The thing I wish I could have changed was making sure that the bottom layer of plastic wrap was smooth so that my cake and whipped cream didn't have little wrinkle lines. This was a fantastic challenge, and absolutely perfect for a hot summer's day! Enjoy!

Toasted Almond & Cherry Ice Cream


Toasted Almond and Candied Cherry Ice Cream
Makes about 1 1/2 Quarts

1 cup whole milk
3/4 cup sugar
pinch of salt
2 cups heavy cream
2 cups whole almonds, toasted and coarsely chopped
5 large egg yolks
1/4 teaspoon almond extract
1 cup candied cherries, coarsely chopped   


To toast almonds:
Preheat oven to 350 degrees. Spread the nuts in an even layer on an ungreased baking sheet. Bake the nuts in the oven for 10 to 12 minutes, stirring them once or twice while baking so they toast evenly. To see if they're done, snap one in half: it should be lightly golden brown throughout. Let the nuts cool completely before using unless the recipe indicates otherwise.

To make candied cherries:
1 pound cherries, fresh or frozen
1 1/2 cups water
1 cup sugar
1 tablespoon freshly squeezed lemon juice
1 drop almond extract

Remove the stems and pit the cherries. Heat the cherries, water, sugar, and lemon juice in a large, nonreactive saucepan or skillet until the liquid starts to boil. Turn down the heat to a low boil and cook the cherries for 25 minutes, stirring frequently during the last 10 minutes of cooking to make sure they are cooking evenly and not sticking. Once the syrup is reduced to the consistency of maple syrup, remove the pan from the heat, add the almond extract, and let the cherries cool in their syrup. Drain the cherries in a strainer for about 1 hour (reserve the syrup for another use). Coarsely chop the drained cherries and fold them into 1 quart of ice cream as you remove it from the machine.

To make the ice cream:
Warm the milk, sugar, salt, and 1 cup of the cream in a medium saucepan. Finely chop 1 cup of the almonds and add them to the warm milk. Cover, remove the heat, and let steep at room temperature for 1 hour.

Strain the almond-infused milk into a separate medium saucepan. Press with a spatula or squeeze with your hands to extract as much flavor from the almonds as possible. Discard the almonds.

Rewarm the almond-infused milk. Pour the remaining 1 cup cream into a large bowl and set a mesh strainer on top. In a separate medium bowl, whisk together the egg yolks. Slowly pour the warm mixture into the egg yolks, whisking constantly, then scrape the warmed egg yolks back into the saucepan.

Stir the mixture constantly over medium heat with a heatproof spatula, scraping the bottom as you stir, until the mixture thickens and coats the spatula. Pour the custard through the strainer and stir it into the cream. Stir in the almond extract and stir until cool over an ice bath.

Chill the mixture thoroughly in the refrigerator, then freeze it in your ice cream maker according to the manufacturer's instructions. After churning (or during the last few minutes), add the remaining 1 cup chopped almonds. When you remove the ice cream from the machine, fold in the chopped cherries.

Chocolate Chocolate Chip Ice Cream


Chocolate Chip Ice Cream
Makes about 1 Quart

2 cups heavy cream
3 tablespoons unsweetened cocoa powder
5 ounces bittersweet or semisweet chocolate, chopped
1 cup whole milk
3/4 cup sugar
pinch of salt
5 large egg yolks
1/2 teaspoon vanilla extract

Warm 1 cup of the cream with the cocoa powder in a medium saucepan, whisking to thoroughly blend the cocoa. Bring to a boil, then reduce the heat and simmer at a very low boil for 30 seconds, whisking constantly. Remove from the heat and add the chopped chocolate, stirring until smooth. Then stir in the remaining 1 cup of cream. Pour the mixture into a large bowl, scraping the saucepan as thoroughly as possible, and set a mesh strainer on top of the bowl.

Warm the milk, sugar, and salt in the same saucepan. In a separate medium bowl, whisk together the egg yolks. Slowly pour the warm milk into the egg yolks, whisking constantly, then scrape the warmed egg yolks back into the saucepan.

Stir the mixture constantly over medium heat with a heatproof spatula, scraping the bottom as you stir, until the mixture thickens and coats the spatula. Pour the custard through the strainer and stir it into the chocolate mixture until smooth, then stir in the vanilla. Stir until cool over an ice bath.

Chill the mixture thoroughly in the refrigerator, then freeze it in your ice cream maker according to the manufacturer's instructions.  (If the cold mixture is too thick to pour into your machine, whisk it vigorously to thin it out.) Once churned, add mix-ins if desired.

Friday, July 23, 2010

Savory Deviled Eggs


Sorry I don't have a great picture of my deviled eggs. I made them quickly (or as quickly as I could) and then we scooted out the door to take them to our picnic at the park. You see, I actually made these deviled eggs back in May for a Mother's Day picnic that we did for my mom down by the lake. Yes, I'm just getting around to posting about them. It's not that I've had so many more things to post about since then, it's just that I kind of saved it in my "if I ever need something to post about" file and that's about where I'm at right now since we spent the whole month of June and some of July out of town. It was more the look than the taste that relegated them to that particular file. I just can't seem to get a great picture of some types of foods so when they look less than appealing I hesitate to put them out there for everyone to see. I guess that's perfectionism in it's worst form, but as I've said before, who cares what it looks like if it tastes good.

I actually had never made deviled eggs before this experience. I always left that task to someone else when we attended picnics and potlucks because I get easily frustrated with shells on hard-boiled eggs that tear off half the egg white along with the shell and I figured if I had to do this for at least a dozen eggs I was sure to go crazy. I managed to stay sane though and most of the shells came off pretty easily. Instead of making the traditional deviled egg recipe, I made one that I saw in a Southern Living magazine that used slightly different ingredients. I had a good experience overall so I think I'll be making more deviled eggs in my future. Enjoy!


Savory Deviled Eggs
Makes 2 dozen

1 dozen large Hard-Cooked Eggs, peeled
2 garlic cloves, minced
3 tablespoons chopped black olives
1 teaspoon lemon zest
1/2 cup olive oil
salt and pepper to taste

**If you don't have a foolproof method to hard-boil eggs, skip to the * at the bottom of this post.*

Slice eggs in half lengthwise; carefully remove yolks, keeping egg white halves intact. Process yolks, garlic, olives, and lemon zest in a food processor until combined, stopping to scrape down sides. (You can see I just used my pastry blender since I don't have a food processor. It worked just fine for me.)

With food processor running, gradually pour olive oil through food chute in a slow, steady stream, processing until mixture thickens. (Again, you don't need a food processor. Just stir it in until completely combined.) Stir in salt and pepper to taste.

Spoon yolk mixture into egg white halves.

*Hard-Cooked Eggs
Place eggs in a single layer in a stainless steel saucepan (do not use non-stick). Add water to a depth of 3 inches, and bring to a rolling boil. Cover and remove from heat. Let eggs stand 12 minutes. Drain immediately, and return eggs to pan. Fill pan with cold water and ice. Tap each egg firmly on the countertop until cracks form all over the shell. Peel under cold running water.

Sunday, July 18, 2010

French-Style Vanilla Ice Cream


What better way to celebrate National Ice Cream day than to bust out the ice cream maker and churn up a batch! I have been thumbing through The Perfect Scoop by David Lebovitz for the past few weeks and each time I look I find new flavors that I want to try out. Having said that, you'll notice that I don't have a recipe for something unusual like black pepper or avocado or even something fruity like plum, but just plain old vanilla. Although to my husband it wouldn't be said with the words "just plain old", it would be his given choice of ice cream. In fact, it was his choice, and since I can add in many different mix-ins I agreed to make homemade vanilla ice cream.

When we've made ice cream in the past we have chosen the no-cook recipes out of the recipe book that came with our ice cream maker. I was completely enlightened when reading Lebovitz's book though and have finally figured out why our homemade ice cream in the past was more like ice milk rather than ice cream. To get the creamier ice creams you have to cook the custard before you churn and freeze it. He tells about two different styles of ice cream, the French style which is the cooked custard that is richer and creamier and then the Philadelphia style that is not cooked but also not quite as fattening. We chose to go all the way this time and actually make the French-Style Vanilla Ice Cream. The process wasn't really that much more difficult than the non-cooked style and I can attest to the fact that it was infinitely more creamy and rich than our homemade ice creams in the past.

                                                                  Cooking the custard

                                                      Putting it through a fine mesh strainer

                                                                  Ready to get churned

                                                       Churned and ready to go in the freezer


I found my recipe in The Perfect Scoop by David Lebovitz, but you can find a modified version online. Our favorite mix-ins were chocolate chunks and chopped toffee-coated macadamia nuts (left over from our trip to Hawaii). We also had crushed Oreo cookies, mini chocolate chips, m&m's, and chopped Andes mints. Enjoy!

French-Style Vanilla Ice Cream
Makes about 1 quart

1 cup whole milk
3/4 cup sugar
2 cups heavy cream
pinch of salt
1 vanilla bean
5 egg yolks
1/2 teaspoon vanilla extract

Warm the milk, sugar, 1 cup of the cream, and salt in a medium saucepan. Split the vanilla bean lengthwise and scrape the seeds into the warm milk; add the bean as well. Cover, remove from the heat, and let steep at room temperature for 30 minutes.

Pour the remaining 1 cup of cream into a large bowl and set a mesh strainer on top. In a separate medium bowl, whisk together the egg yolks. Slowly pour the warm mixture into the egg yolks, whisking constantly, then scrape the warmed egg yolks back into the saucepan.

Stir the mixture constantly over medium heat with a heatproof spatula, scraping the bottom as you stir, until the mixture thickens and coats the spatula. Pour the custard through the strainer and stir it into the cream. Put the vanilla bean into the custard, add the vanilla extract, and stir until cool over an ice bath.

Chill the mixture thoroughly in the refrigerator. When ready to churn, remove the vanilla bean, rinsing and reserving it for another use, and then freeze the mixture in your ice cream maker according to the manufacturer's instructions.

Homemade Ice Cream Cones


 Not only did we make homemade ice cream, but we also made our own ice cream cones. Ours turned out to be more like ice cream bowls instead of cones, but we definitely aren't picky when it comes to what shape the container is that holds our ice cream!

The cones tasted good but I don't know if we'll make them anytime soon. The recipe only makes 6 cones, and while you could double or even triple it, you can only bake two cones at a time so it takes a bit to get the whole batch finished. I used a very small glass to shape our cones since we have not invested in a cone rolling form. This recipe also came from The Perfect Scoop by David Lebovitz. Enjoy!


Ice Cream Cones
Makes 6 cones

1/4 cup egg whites (about 2 large egg whites)
7 tablespoons sugar
1/2 teaspoon vanilla extract
 1/8 teaspoon salt
2/3 cup flour
2 tablespoons unsalted butter, melted

Preheat the oven to 350 degrees.

In a small mixing bowl, stir together the egg whites, sugar, and vanilla. Stir in the salt and half of the flour, then  mix in the melted butter. Beat in the rest of the flour until smooth.

Line a baking sheet with parchment paper and use a small offset spatula or the back of a spoon to spread 2 level tablespoons of the batter into a circle 6 inches across. Try to get the circles as even and smooth as possible (you're likely to get 2 rounds on one standard baking sheet).

Put the baking sheet in the oven and begin checking the cones after 10 minutes. Depending on your oven, they'll take between 10 and 15 minutes to bake. The circles should be a deep golden brown throughout. Remove the baking sheet from the oven. Use a thin metal spatula to loosen the edge of one disk. Slide the spatula under the disk, quickly flip it over, and immediately roll it around the cone-rolling form, pressing the seam firmly on the counter to close the cone and pinching the point at the bottom securely closed. Let the cone cool slightly on the mold until it feels firm, then slide it off and stand it upright in a tall glass to cool. Roll the other cone the same way. (I had to put my second cone back in the oven for a few seconds so it was pliable. It cools down too much in the short time it takes to shape the first one.)

Repeat, using the remaining batter. You'll find it easier to spread the batter if you slide the reusable parchment paper off the warm baking sheet and onto a second sheet that is room temperature; any heat form the baking sheet will make the batter fussy to spread.

The batter can be made up to 4 days in advance and stored in the refrigerator. Let the batter come to room temperature before using. Once baked and cooled, store the cones in an airtight container until ready to serve. They're best the same day they're baked.

Monday, July 12, 2010

Original Nestle Toll House Chocolate Chip Cookies


Everyone has to have a go-to recipe for chocolate chip cookies, and this would be mine. When I have to bake something up fast or wrap something up for a goodie bag this is usually the one that I turn to. It sometimes seems like the possibilities are endless for mix-ins. I typically stick to the basic chocolate chip cookie ingredients but there are times when I use semi-sweet chips, sometimes a mix of semi-sweet and white chocolate chips, sometimes walnuts, sometimes pecans, sometimes a mix of the two. I have halved this recipe as well as doubling it. I have formed these into monster cookies, regular size cookies, miniature cookies, bar cookies, and I have recently just rolled them into balls and popped them in the freezer to take out on the road for our camping trip. You can never go wrong with chocolate chip cookies! Enjoy!

Chocolate Chip Cookies
Makes about 5 dozen cookies

2 1/4 cups all-purpose flour
1 teaspoon baking soda
1 teaspoon salt
1 cup butter, softened
3/4 cup granulated sugar
3/4 cup packed brown sugar
1 teaspoon vanilla extract
2 eggs
2 cups (12 ounce package) semi-sweet chocolate chips (or 1 cup semi-sweet/1 cup white chocolate)
1 cup chopped walnuts (or pecans)

Preheat oven to 375 degrees. Combine flour, baking soda, and salt in small bowl. Beat butter, granulated sugar, brown sugar and vanilla in large mixer bowl until creamy. Add eggs one at a time, beating well after addition. Gradually beat in flour mixture. Stir in chips and nuts. Drop by rounded tablespoon onto ungreased baking sheets.

Bake for 9 to 11 minutes or until golden brown. Let stand for 2 minutes; remove to wire racks to cool completely.

For Bar Cookies:
Prepare dough as above. Spread into greased 15x10-inch jelly-roll pan. Bake in preheated 375 degree oven for 20-25 minutes or until golden brown. Cool completely in pan on wire rack. Cut into bars. Makes about 4 dozen.

Monday, July 5, 2010

Maple-Oatmeal Scones


I love baking new varieties of scones! I was looking for something that didn't contain fruit since the last few I've baked have had cranberries and orange, but I also didn't want something savory. This was a great choice because it bakes up light and fluffy but it also has a bit of sweet with the maple glaze. We also enjoyed them later after they had been frozen, thawed, and reheated in the microwave. Enjoy!

Maple-Oatmeal Scones
Source: Brown Eyed Baker

4 1/2 cups all-purpose flour
1 cup quick cooking oats
2 tablespoons baking powder
2 tablespoons sugar
2 teaspoons salt
2 cups cold unsalted butter, diced
1/2 cup cold buttermilk
1/2 cup pure maple syrup
4 extra-large eggs, lightly beaten
1 egg beaten with 1 tablespoon water or milk, for egg wash
---
1 1/4 cups confectioner's sugar
1/2 cup pure maple syrup
1 teaspoon vanilla extract

Preheat oven to 400 degrees. Line baking sheets with parchment paper.

Combine flour, oats, baking powder, sugar, and salt. Blend in the cold butter until the butter is in pea-sized pieces. Combine the buttermilk, maple syrup, and eggs and add quickly to the flour-butter mixture. Mix until just blended. The dough may be sticky.

Dump dough onto a well-floured surface and be sure all ingredients are combined. Flour your hands and a rolling pin and roll the dough to 3/4 to 1-inch thick. You should see lumps of butter in the dough. Cut into 3-inch rounds with a plain or fluted cutter and place on baking sheet.

Brush the tops with egg wash. Bake for 20-25 minutes (mine only took 14 minutes), until the tops are crisp and the insides are done.

To make the glaze, combine the confectioner's sugar, maple syrup, and vanilla. When the scones are done, cool for 5 minutes, and drizzle each scone with about 1/2 teaspoon of glaze. Sprinkle some uncooked oats on the top, for a garnish. The warmer the scones are when you glaze them, the thinner the glaze will be.

Thursday, July 1, 2010

Buttery Almond and Coconut Cake


Delicious! This cake melts in your mouth. You can make it even more diabetic friendly by substituting the sugar with another form of sweetener. Enjoy!

Buttery Almond and Coconut Cake
Makes one 10-inch cake or two 5-inch cakes

180 grams almond flour
2/3 cup shredded coconut
1/4 teaspoon salt
1 cup sugar
4 eggs
1 1/2 teaspoons vanilla extract
1/4 teaspoon almond extract
200 grams unsalted butter, melted and cooled
3 tablespoons flaked/sliced almonds

Preheat oven to 350 degrees. Butter springform pan(s) and line with buttered baking paper. Dust the baking paper lightly with flour.

Put almond flour, coconut, salt, and sugar into a bowl and mix together with a whisk. Set aside.

In another bowl, beat the eggs, vanilla extract, and almond extract until combined. Mix in the cooled butter until combined. Stir the dry mixture into the wet mixture. Scrape into the pan(s), spread evenly, and scatter flaked almonds on top.

Bake for about 40 minutes or until the cake springs back slowly when pressed. Slide knife around edge to loosen from pan and cool on rack. Remove from pan to serve.

**Can store for a week in fridge or 3 weeks in the freezer. Bring to room temperature to serve.**