CLICK HERE FOR FREE BLOGGER TEMPLATES, LINK BUTTONS AND MORE! »
Showing posts with label daring bakers. Show all posts

Thursday, September 27, 2012

Daring Bakers - Empanadas


Patri of the blog, Asi Son Los Cosas, was our September 2012 Daring Bakers’ hostess and she decided to tempt us with one of her family’s favorite recipes for Empanadas! We were given two dough recipes to choose from and encouraged to fill our Empanadas as creatively as we wished!

Back to the Daring Bakers challenges after a two month break and it feels good! Our September challenge was to make Empanadas. I had heard of these before but had yet to make one. Well, nothing like making both a savory and sweet version on the same day, right?

I wanted to make a savory version for dinner. This recipe was fabulous because it actually used things out of my pantry. Have you ever tried to make a recipe that says that it uses ingredients out of the pantry yet you run across something that just isn't in a normal person's pantry? I know that sounds a bit silly, but this recipe actually used things from my pantry. No extra trips to the store!

I chose to make the wheat flour Empanada dough and fill it with shredded chicken, black beans, pepper jack cheese, tomatoes, and cream cheese. Yum, yum, yum! The flavors melded together beautifully! The dough was a dream to work with. I didn't even use any extra flour because it wasn't necessary.


 (By the way, the dog bone on top is in celebration of our dog's 8th birthday - the day of our Empananda smorgasboard!)


Savory Empanada Dough
3 1/2 cups all purpose flour
1 cup warm water
1/2 cup less 1 tablespoon of liquid fat (I used olive oil)
1 tablespoon dry yeast
1 teaspoon salt
1 teaspoon paprika

Sift the flour into a bowl. Make a well in the middle and add all of the ingredients. Mix with a wooden spoon until all of the ingredients have been incorporated.

Turn dough onto the counter and knead for 5 to 8 minutes. Shape into a ball and allow to rise covered with a cloth for 30-50 minutes before using.

While the dough is rising, mix up the filling.

Preheat oven to 350 degrees F. Grease and flour the pan (round or square, approximately 9x9). Divide the dough in half. Roll out bottom crust (it will be slightly larger than the top piece). Place bottom crust in pan; add filling. Roll out top crust; place on top. Pinch seam of top and bottom crust. Use extra crust for decoration on top. Pierce top crust with fork for venting; brush with egg wash.

Bake for about 45 minutes or until crust is golden brown. Remove and serve warm.

Empanada Filling
3 cups cooked chicken, shredded
1 can black beans, drained and rinsed
8 oz. pepper jack cheese, shredded
tomatoes, diced
4 oz. cream cheese, softened

*****              *****            *****             *****

The apple pear empanada was also amazing! It tasted just like apple pie. I made the crust thin enough that it wasn't too bread like and was very similar to pie crust. It wasn't quite as flaky as my traditional pie crust but it was delicious. I would definitely recommend this! Enjoy!


Sweet Empanada Crust
Same recipe as above, just add 2 tablespoons of sugar to dry ingredients.


Apple Pear Filling
Source: Vegephant

2 apples
3 pears
2 tablespoons of agave nectar
1/2 teaspoon of cinnamon
1 teaspoon of sugar
1/2 teaspoon of salt
1 teaspoon of all-purpose flour

Cut apples and pears into slices or chunks. Mix together. Drizzle the fruit with agave nectar and mix thoroughly. Sprinkle the cinnamon, sugar, salt, and flour on the mixture. Mix and let set.

Saturday, July 28, 2012

Daring Bakers - Crackers

Our July 2012 Daring Bakers’ Host was Dana McFarland and she challenged us to make homemade crackers! Dana showed us some techniques for making crackers and encouraged to use our creativity to make each cracker our own by using ingredients we love. 


Whew! I made it before the end of July. I know Daring Bakers posts usually happen on the 27th of the month but I'm feeling pretty good about getting this challenge done and posted while still in the month of July. 

This summer has been crazy busy for us. Basically the day after school got out for me we have been going, going, going. I didn't end up doing the June challenge and I thought I might not have time to make this one either but it turned out to be surprisingly easy. Sometimes just thinking about what the techniques are (especially if it is something new for me) and then what flavors to do take more effort than the actual act of making the item.Enough of the explanation on tardiness and on to the challenge. 

This month we had to make homemade crackers using two different techniques. I'm sure there are other methods, but the three presented to us were hand shaping, using a pasta roller, or shaping into a log and slicing into coins. I don't have a pasta roller so I decided to make one batch hand shaped and another batch using the sliced icebox method.

Let's chat about the first batch, shall we. I decided to make the Health Crackers. I had just about everything necessary and they seemed to be easy enough to do. I did end up switching out ground flax seeds for the wheat germ since I don't usually have wheat germ on hand but plenty of ground flax. They came together quickly and I was planning to stick them in the fridge for their 20 minute rest until I realized it was almost 10 o'clock at night. I guess time got away from me, so I decided to leave it in the fridge over night and come back to it in the morning.


I did decide to get the second batch made and refrigerated as well. For that batch I decided to use one cup of cheddar cheese and one cup of Masdammer (similar to Swiss) which we picked up at a local dairy while out on our latest bike adventure. I used almonds instead of the walnuts suggested since my walnuts were old and yucky tasting. I again refrigerated them over night.

The next day I pulled out both batches of dough. The Health Crackers were not super pliable. They have to stay cold otherwise they stick but they don't stay together well if they are cold. Kind of a catch 22. I rolled out one quarter, brushed on the egg wash and then sprinkled with sesame seeds and coarse salt. They cut easily with a pizza cutter and they took about 30 minutes to brown up in the oven.


The Cheddar, Almond, and Rosemary were easy to slice but they took much longer in the oven than the recipe stated. My crackers took about 20 minutes to bake but they were nice and crisp at the end of it. They break apart easily though so be careful where you eat these if you are worried about crumbs. Enjoy! 


Health Crackers
3 cups rolled oats
2 cups all-purpose flour
1 cup wheat germ (I used ground flax seeds)
3 tablespoons sugar
1 teaspoon salt
3/4 cup vegetable oil
1 cup water
1 large egg white
Cracker topping:
Sesame seeds, poppy seeds, nigella (onion) seeds, salt
Salt for sprinkling

Mix the oats, flour, wheat germ, sugar and salt together in a large bowl or bowl for the standup mixer.

Combine the water and oil and stir into the oat mixture until it comes together and a dough forms.

Form dough into a disk and allow to rest in the fridge for about 20 minutes but up to a day if you are making them ahead.

Preheat the oven to 325°F. Divide the dough into quarters and work with one piece at a time, allowing the remaining pieces to stay in the fridge as you proceed with rolling out the crackers.

On a lightly floured surface, roll the dough to about 1/16 inch thick and transfer to a parchment lined baking sheet by carefully wrapping the dough around the rolling pin.

Brush the dough with the egg white mixed briefly with a tablespoon of water and sprinkle with seeds and salt of your choice.
Cut the dough with a pizza wheel and bake for 25-30 minutes until browned. Crackers that are not crispy once cooled may be returned to the oven.

Store in an airtight container and eat within two weeks.

Cheddar, Almond, and Rosemary Crackers
1/2 cup butter, well softened
1 tablespoon finely chopped rosemary
2 1/4 cups grated aged cheddar cheese, firmly packed
1 cup plus 3 tablespoons all-purpose flour
1 teaspoon salt
1/2 cup finely chopped walnuts

Combine butter, rosemary, and cheese in a stand mixer and beat well (can also be done by hand). Add the flour, salt, and nuts and stir to combine. 

Form the dough into two tight logs and wrap with cling film. Chill for at least an hour and up to several days. (The log can be frozen at this point for several months.)

Heat the oven to 325°F. Slice a log into 1/5 inch coins and place on a parchment lined baking sheet. Bake about 10 minutes until golden brown. (Mine took 20 minutes to get brown.)

Store in an airtight container and eat within three days.

Wednesday, May 30, 2012

Cinnamon, Sugar, and Raisin Challah


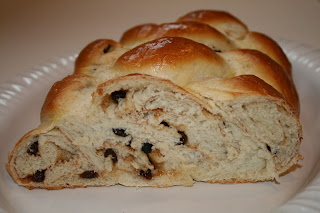
Loaf number four, cinnamon, sugar, and raisins all rolled up in honey white goodness. While this loaf was tasty coming out of the oven it was even better a few days later as french toast! I made this loaf similar to the caramel chocolate. I divided the dough into four equal pieces, rolled out each piece and spread cinnamon sugar and raisins on it, then rolled it back up. I also did a four strand braid for the same reason as the other loaf. It worked beautifully! You can see a few raisins peeking out from the finished loaf. Enjoy!


Tuesday, May 29, 2012

Caramel Chocolate Challah


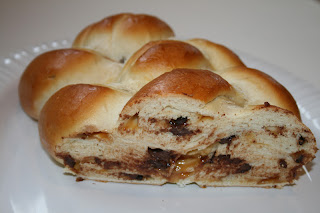
Melted chocolate and gooey caramel in soft, warm, home baked bread, how can this combination be wrong? This loaf was my absolute favorite of the four loaves of Challah that I made! Unfortunately that also meant that it was the first loaf gone of the four. I was pretty sad when we polished off the last slice, enough so that I definitely plan to make another batch of this soon.

These next two loaves (the caramel chocolate and cinnamon raisin) came from the second batch of dough. Here is the monster rise of the second loaf, this time with no thumb prints! One of these days I will have to take a picture of this bowl next to a regular size bowl so you can really appreciate the rise of this dough. 


I separated the dough into two even balls and set one aside for the cinnamon raisin. I decided to do a four strand braid for this because I really liked the look of the four strand versus the three strand. I didn't want to attempt the six strand because I wasn't sure how easy it would be to have six strands that were filled. As it was you can see that the rolled strand with the caramel and chocolate pieces in it was pretty thick. For the filled strands, you roll out each strand similar to a cinnamon roll, put in the filling, and then roll it up and pinch the seam. All four strands then get pinched together and you braid it similar to the plain four strand.


The photo below shows the caramel chocolate on the left having risen for another 30 minutes and the cinnamon, sugar, and raisin on the right just ready for its second rise while the caramel chocolate goes in the oven. Timing wise it worked out great!


As you can tell, this variety was my favorite, favorite, favorite! I would definitely recommend making a loaf of this. Enjoy!

Caramel Chocolate Challah
Source: The Challah Blog

Basic Honey White Challah
1 1/2 cups warm water, separated
1 tablespoon sugar
2 tablespoons dry active yeast

1/2 cup honey
1 tablespoon oil (light colored vegetable oil, or olive oil if you prefer)
4 large eggs
1 1/2 teaspoon salt
5 cups all-purpose flour, plus more as needed (up to 8 or 9 cups total)
1 egg beaten with 1 teaspoon water
semi-sweet chocolate chips
caramel bits (or you can cut caramels into chip sized pieces) 
In a large mixing bowl, combine 1/2 cup warm water, 1 tablespoon sugar and 2 tablespoons yeast. Allow to sit 5-10 minutes until foamy.

To the yeast mixture add the remaining water, honey, oil, eggs, salt and 5 cups of flour. Knead (by hand or with your mixer’s dough hook) until smooth, adding flour as needed. Knead for approximately 10 minutes.

Transfer dough to a clean, oiled bowl; turn to coat or add a bit more oil on top. Cover bowl with a kitchen/tea towel. Leave to rise in a warm place until doubled, about 11/2 hours.

Punch down the dough, divide it into two sections. Use one half to make each loaf. 
For a four braid loaf, separate the one half dough into four equal pieces. Roll out each piece separately, spread chocolate chips and caramel pieces over rolled dough. Roll up the dough length wise (as you would a cinnamon roll), set each strand aside until all four are filled.
Pinch one end of all four braids together. Braid and tuck ends under. Place braided loaves on parchment lined or greased baking sheets, cover with a towel, allow to rise 30 minutes.

Preheat oven to 325 degrees F. Brush tops loaves with egg wash. (Sprinkle with seeds or toppings here if wanted.) Bake loaves 30-40 minutes until done. Cool on wire racks.

Makes 2 loaves

Monday, May 28, 2012

Nutella Challah


Tada! Nutella Challah, made from the "other" loaf from my first batch of honey white dough. I knew it was going to be a bit of a challenge to make it because I don't like when things get messy in the middle of making something. And this got messy!

I started my process the same as the other loaf. Basic honey white dough mixed together and set to rise for about 2 hours. After the rise I divided the dough into three equal weight pieces. I then rolled them out the same way, a bit thicker in the middle compared to the ends.


So here is where it got a bit challenging, or at least messy, which challenged me! I made a dent (kind of like a trough or something) along the entire rope. I then spooned Nutella along the entire length. After I spooned on the Nutella I gently pulled the dough on each side of the Nutella up and around it and pinched the dough together. Let me just say that you definitely get better with practice. The first one was a bit touch and go, but by the time I got to the second one I was pretty comfortable with it and had figured out what method worked best to get the dough up and over the Nutella.


After all three ropes were filled and pinched I carefully moved them into position for braiding. I decided to do a three strand braid because the ropes were pretty thick with the filling and I didn't want to take a chance that more I braided the more the filling would leak through. I started braiding in the middle and went from the middle to one end, then from the middle to the other end.


There was a bit of Nutella leakage, but not much considering. I was pretty happy with how my braid turned out. This also sits and rises for about 30 more minutes and then gets baked for 30 minutes. It was pretty awesome right out of the oven.


Out of the four varieties this was my husband's favorite (mine will be next). It was surprisingly easy to make, if you can get over the bit of messiness that comes with stuffing filling inside of a braid. Enjoy!

Sunday, May 27, 2012

Daring Bakers - Challah

May’s Daring Bakers’ Challenge was pretty twisted – Ruth from The Crafts of Mommyhood challenged us to make challah! Using recipes from all over, and tips from “A Taste of Challah,” by Tamar Ansh, she encouraged us to bake beautifully braided breads.

Such a blast! I really love baking bread, especially breads with yummy fillings that look beautiful! I have had Challah (pronounced ha-lah) on my to do list for a few years now. Who knew it could be so easy? Until now I sure didn't!

I ended up making two different batches with two loaves each for a total of four loaves of bread. All four loaves ended up being plain or sweet. I thought about doing a savory bread but I made homemade pizza the same day so that was my savory for the day.
All four of my loaves are a honey white bread for the base. I am going to show all four on here but I really think that like the quick bread post each bread needs its own time. I used different techniques and different breads for each bread, so if you really like how one sounds you might have to come back in a few days for the actual recipe.


I started by making the dough and letting it rise in my warm kitchen. You can see that it was a monster after 2 hours of sitting in the bowl (that is my largest bowl from Tupperware). And you can also see that just as I was going to grab my camera to get a picture of the glorious rise, my husband poked his thumb around the entire thing.  


I decided to do a four strand braid for my first loaf because it looked fairly easy to do, easier than the six strand, and I was going to save the three strand for the breads that had fillings. I divided the dough into fourths and rolled out each ball so that the center of each rope was a bit fatter than both ends.


Once all four ropes are rolled out you position them and pinch one end of each of the four strands together. It sure is nice to have pictures, huh. Sometimes you just can't figure out how to word stuff so other people know what you are talking about. After you pinch the ends together, you begin braiding. I did the method Ruth shared of "farthest left strand goes over, then under, then over" etc. I kept chanting that as I braided to make sure I was going under and over when I was supposed to. It was really easy to do and before I knew it I had a beautifully braided loaf.


After sitting for another half an hour or so this loaf went into the oven where it baked for 30 minutes exactly. I was so giddy the few times I peeked in at it because it was actually doing what it was supposed to do! It's always nice when that happens. The final result was a soft loaf of bread that was beautifully braided and browned. We had a few slices while it was warm but then turned to the more exciting twin that came from the same dough.


I'll post on the other breads over the next few days. They also were made with the honey white bread base but I used a few different techniques to fill the strands before braiding. This would be way too long of a post if I included all the info, photos, and recipes that I gathered for this challenge. In the meantime, enjoy!

Nutella Challah

Caramel Chocolate Challah

Cinnamon, Sugar, and Raisin Challah

Honey White Challah
Source: Tammy's Recipes

1 1/2 cups warm water, separated
1 tablespoon sugar
2 tablespoons dry active yeast
1/2 cup honey
1 tablespoon oil (light colored vegetable oil, or olive oil if you prefer)
4 large eggs
1 1/2 teaspoon salt
5 cups all-purpose flour, plus more as needed (up to 8 or 9 cups total)
1 egg beaten with 1 teaspoon water

In a large mixing bowl, combine 1/2 cup warm water, 1 tablespoon sugar and 2 tablespoons yeast. Allow to sit 5-10 minutes until foamy.

To the yeast mixture add the remaining water, honey, oil, eggs, salt and 5 cups of flour. Knead (by hand or with your mixer’s dough hook) until smooth, adding flour as needed. Knead for approximately 10 minutes.

Transfer dough to a clean, oiled bowl; turn to coat or add a bit more oil on top. Cover bowl with a kitchen/tea towel. Leave to rise in a warm place until doubled, about 11/2 hours.

Punch down the dough, divide it into two sections. Use one half to make each loaf. Shape or braid as desired. Place braided loaves on parchment lined or greased baking sheets, cover with a towel, allow to rise 30 minutes.

Preheat oven to 325 degrees F. Brush tops loaves with egg wash. (Sprinkle with seeds or toppings here if wanted.) Bake loaves 30-40 minutes until done. Cool on wire racks.

Makes 2 loaves

Tuesday, March 27, 2012

Daring Bakers - Dutch Crunch Bread


 Sara and Erica of Baking JDs were our March 2012 Daring Baker hostesses! Sara & Erica challenged us to make Dutch Crunch bread, a delicious sandwich bread with a unique, crunchy topping. Sara and Erica also challenged us to create a one of a kind sandwich with our bread!

Dutch Crunch Bread - I love the sound of that! Anything that has "crunch" in the title draws me to it. The Daring Bakers challenge this month was to make this type of bread which I had never heard of before. The pictures absolutely fascinated me! 

Dutch Crunch Bread, also known as Tiger Bread (although in my case I think it looks more like a giraffe or a cheetah with all of those spots instead of stripes) is made from a regular white bread recipe and then coated with the Dutch Crunch topping.

You'll have to excuse my first photo up there. I usually like to take a nice photo that showcases the recipe but I just didn't have a lot of time and was planning to showcase the sandwiches that I constructed using the Dutch Crunch Bread. Anyway, I digress.

I didn't have any trouble with the bread dough. It came together as it should and rose to the desired size in the expected time frame. I slathered it with the Dutch Crunch topping, which I have to admit reminded me a bit of the paper-mache days as a kid. I was curious as to whether the dough would "deflate" some with the topping on it, but it seems to hold its shape just fine.


At this point I wasn't really sure what to expect. So many different varieties of the bread had been posted on the forum, some beautifully crackled and darkened, others pale with no cracks. There seemed to be uncertainty as to what was going to come out of the oven. I was pleasantly surprised when I cracked open the door and saw that there was crackling and browning on the outside of the crust. Since they came out of the oven pretty late in the evening we saved the sandwich rolls for lunch the next day. 


Hot ham and Swiss sounded like a great combination on the day that I made sandwiches. Gooey, tangy Swiss cheese melted into Black Forest Ham. Yum! I'll take one now, please. The bread reminded me a bit of a kaiser roll or a ciabatta bun. Not quite chewy like a kaiser and it crumbled a bit more than a ciabatta. It wasn't sweet like it sounded like Dutch Crunch Bread is but it was a nice sandwich roll.


Since we only used 3 of the 6 rolls we put the leftovers in a ziploc bag for the next day. I didn't want them drying out and becoming hard as rocks, but I'm not sure if having them in a somewhat air-tight package made their taste a little more blah. Kind of hard to describe, but I didn't feel like the sandwiches the next day were as tasty. It could have also been that I didn't warm up my roll like I did the day before. It seemed to crumble a lot more and was just a ho-hum kind of bread. Pretty, but not spectacular tasting.


Either way you slice it, these sandwich rolls were fun to make and pretty fun to eat! I'm thinking I'll try them again to see if there is another bread recipe I like better with the Dutch Crunch topping. Enjoy!

Dutch Crunch Topping
(layer on any white bread recipe you'd like to)

2 tablespoons (2 packets) active dry yeast
1 cup warm water (105-115ยบ F)
2 tablespoons sugar
2 tablespoons vegetable oil (or sesame oil)
1/2 teaspoon salt
1 1/2 cups rice flour (white or brown; NOT sweet or glutinous rice flour)

Combine all ingredients in a large bowl and beat with a whisk; beat hard to combine. The consistency should be like stiff royal icing – spreadable, but not too runny. If you pull some up with your whisk it should drip off slowly. Add more water or rice flour as necessary. Let stand 15 minutes.

Using a brush, spoon, or your fingers, coat the top of each loaf or roll with a thick layer of topping and spread it around. (Error on the side of applying too much topping – a thin layer will not crack properly.)

Let stand, uncovered, for any additional time your recipe recommends.

When baking, place pans on a rack in the center of the oven and bake your bread as you ordinarily would. The Dutch Crunch topping should crack and turn a nice golden-brown color.